Exercise 5 - Event Based Gateways and Intermediate Events
Prerequisites | Exercise 1 | Exercise 1.1 | Exercise 2 | Exercise 3 | Exercise 4 | Exercise 5
Exercise 5 - Event Based Gateways and Intermediate Events
In the final exercise we will look at message flow between three organizations as well as how to continue a waiting process if no return message arrives. With this exercise we will add a third process and complete a message loop from Test_DIC to Test_COR to Test_HRP back to Test_DIC.
Introduction
Managing Multiple- and Missing Messages
If an existing and started process instance is waiting for a message from another organization, the corresponding FHIR Task may never arrive. Either because the other organization decides to never send the "message" or because some technical problem prohibits the Task resource from being posted to the DSF FHIR server. This would result in stale process instances that never finish.
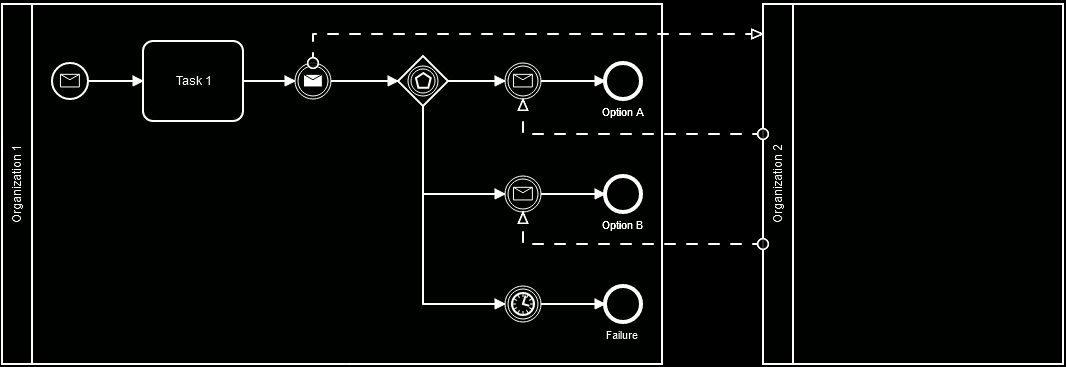
In order to solve this problem we can add an Event Based Gateway to the process waiting for a response and then either handle a Task resource with the response and finish the process in a success state or fire of an Intermediate Timer Catch Event after a defined wait period and finish the process in an error state. The following BPMN collaboration diagram shows how the process at the first organization would look like if two different message or no message could be received:
Timer Events
For Timer Events the duration until the timer fires is specified using the ISO 8601 Durations format. Examples can be found in the Camunda 7 documentation.
Matching Process Instances With Business Keys
In the example above the first organization is sending a "message" to the second and waiting for a reply. In order to correlate the return message with the waiting process instance, a unique identifier needs to be exchanged between both process instances. Within the DSF this is implemented using the process instance business-key and a corresponding Task.input parameter. For 1:1 communication relationships this is handled by the DSF BPE servers automatically, but the corresponding Task profiles need to define the business-key input parameter as mandatory.
If multiple message are send in a 1:n relationship with a n:1 return an additional correlation-key needs to be configured in order to correlate every bidirectional communication between two DSF instances.
ActivityDefinitions for the DSF
FHIR ActivityDefinition resources are used to announce what processes can be instantiated at a given DSF instance and contain the authorization rules for the specified process. ActivityDefinition for the DSF need to comply with the http://highmed.org/fhir/StructureDefinition/activity-definition profile, with authorization rules configured using the http://highmed.org/fhir/StructureDefinition/extension-process-authorization extension.
The authorization extension needs to be configured at least once and has four sub extensions:
message-name [1..1]
String value specifying the message name of Message Start Event, Intermediate Message Catch Event or Message Receive Task this authorization rule should match. Can only be specified once per authorization rule extension.
task-profile [1..1]
Canonical URL value specifying the Task profile this authorization rule should match. Can only be specified once per authorization rule extension.
requester [1..]
Coding value matching entries from the http://highmed.org/fhir/ValueSet/process-authorization-requester ValueSet:
LOCAL_ORGANIZATION A local organization with a specific identifier. The organization identifier needs to specified using the http://highmed.org/fhir/StructureDefinition/extension-process-authorization-organization extension.
REMOTE_ORGANIZATION A remote (non local) organization with a specific identifier. The organization identifier needs to specified using the http://highmed.org/fhir/StructureDefinition/extension-process-authorization-organization extension.
LOCAL_ROLE A local organizations with a specific role defined via OrganizationAffiliation. Role and consortium identifier need to be specified using the http://highmed.org/fhir/StructureDefinition/extension-process-authorization-consortium-role extension.
REMOTE_ROLE A remote (non local) organizations with a specific role defined via OrganizationAffiliation. Role and consortium identifier need to be specified using the http://highmed.org/fhir/StructureDefinition/extension-process-authorization-consortium-role extension.
LOCAL_ALL All local organizations regardless of their identifier or role in a consortium.
REMOTE_ALL All remote (non local) organizations regardless of their identifier or role in a consortium.
recipient [1..]
Coding value matching entries from the http://highmed.org/fhir/ValueSet/process-authorization-recipient ValueSet.
LOCAL_ORGANIZATION Organization with a specific identifier. The organization identifier needs to specified using the http://highmed.org/fhir/StructureDefinition/extension-process-authorization-organization extension.
LOCAL_ROLE Organizations with a specific role defined via OrganizationAffiliation. Role and consortium identifier need to be specified using the http://highmed.org/fhir/StructureDefinition/extension-process-authorization-consortium-role extension.
LOCAL_ALL All organizations regardless of their identifier or role in a consortium.
The local organization of a DSF instance is configured using the environment variables ORG_HIGHMED_DSF_FHIR_SERVER_ORGANIZATION_IDENTIFIER_VALUE for the DSF FHIR server and ORG_HIGHMED_DSF_BPE_FHIR_SERVER_ORGANIZATION_IDENTIFIER_VALUE for the DSF BPE server.
Authorization Extension Example
The following example specifies that process execution can only be requested by a organization with a specific identifier and only allows execution of the process in the DSF instance of an organization with a specific identifier.
<extension url="http://highmed.org/fhir/StructureDefinition/extension-process-authorization">
	<extension url="message-name">
		<valueString value="some-message-name" />
	</extension>
	<extension url="task-profile">
		<valueCanonical value="http://foo.org/fhir/StructureDefinition/profile|#{version}" />
	</extension>
	<extension url="requester">
		<valueCoding>
			<extension url="http://highmed.org/fhir/StructureDefinition/extension-process-authorization-consortium-role">
				<extension url="consortium">
					<valueIdentifier>
						<system value="http://highmed.org/sid/organization-identifier" />
						<value value="identifier.consortium.org" />
					</valueIdentifier>
				</extension>
				<extension url="role">
					<valueCoding>
						<system value="http://highmed.org/fhir/CodeSystem/organization-role" />
						<code value="SOME_ROLE" />
					</valueCoding>
				</extension>
			</extension>
			<system value="http://highmed.org/fhir/CodeSystem/process-authorization" />
			<code value="REMOTE_ROLE" />
		</valueCoding>
	</extension>
	<extension url="recipient">
		<valueCoding>
			<extension url="http://highmed.org/fhir/StructureDefinition/extension-process-authorization-consortium-role">
				<extension url="consortium">
					<valueIdentifier>
						<system value="http://highmed.org/sid/organization-identifier" />
						<value value="identifier.consortium.org" />
					</valueIdentifier>
				</extension>
				<extension url="role">
					<valueCoding>
						<system value="http://highmed.org/fhir/CodeSystem/organization-role" />
						<code value="SOME_ROLE" />
					</valueCoding>
				</extension>
			</extension>
			<system value="http://highmed.org/fhir/CodeSystem/process-authorization" />
			<code value="LOCAL_ROLE" />
		</valueCoding>
	</extension>
</extension>
Exercise Tasks
- Modify the
HelloCosMessageand use the value from the Task.input parameter of thehelloDicTask to send it to thehighmedorg_helloCosprocess via a Task.input parameter in thehelloCosTask. Override thegetAdditionalInputParametersto configure a Task.input parameter to be send. - Modify the
highmedorg_helloCosprocess to use a Message End Event to trigger the process in filehello-hrp.bpmn. Figure out the values for theinstantiatesUri,profileandmessageNameinput parameters of the Message End Event based on the AcitvityDefinition in filehello-hrp.xml. - Modify the
highmedorg_helloDicprocess:- Change the Message End Event to an Intermediate Message Throw Event
- Add an Event Based Gateway after the throw event
- Configure two cases for the Event Based Gateway:
- An Intermediate Message Catch Event to catch the
goodbyDicmessage from thehighmedorg_helloHrpprocess. - An Intermediate Timer Catch Event to end the process if no message is sent by the
highmedorg_helloHrpprocess after two minutes. Make sure both cases finish with a process End Event.
- An Intermediate Message Catch Event to catch the
- Modify the process in file
hello-hrp.bpmnand set the process definition key and version. Figure out the appropriate values based on the AcitvityDefinition in filehello-hrp.xml. - Add the process in file
hello-hrp.bpmnto theTutorialProcessPluginDefinitionand configure the FHIR resources needed for the three processes. - Add the
HelloCos,HelloHrpMessage,HelloHrpandGoodbyeDicMessageclasses as spring beans.
Solution Verification
Maven Build and Automated Tests
Execute a maven build of the dsf-process-tutorial parent module via:
mvn clean install -Pexercise-5Verify that the build was successful and no test failures occurred.
Process Execution and Manual Tests
To verify the highmedorg_helloDic, highmedorg_helloCos and highmedorg_helloHrp processes can be executed successfully, we need to deploy them into DSF instances and execute the highmedorg_helloDic process. The maven install build is configured to create a process jar file with all necessary resources and copy the jar to the appropriate locations of the docker test setup.
- Start the DSF FHIR server for the
Test_DICorganization in a console at location.../dsf-process-tutorial/test-setup:
docker-compose up dic-fhirVerify the DSF FHIR server started successfully.
- Start the DSF BPE server for the
Test_DICorganization in a second console at location.../dsf-process-tutorial/test-setup:
docker-compose up dic-bpeVerify the DSF BPE server started successfully and deployed the highmedorg_helloDic process.
- Start the DSF FHIR server for the
Test_COSorganization in a third console at location.../dsf-process-tutorial/test-setup:
docker-compose up cos-fhirVerify the DSF FHIR server started successfully.
- Start the DSF BPE server for the
Test_COSorganization in a fourth console at location.../dsf-process-tutorial/test-setup:
docker-compose up cos-bpeVerify the DSF BPE server started successfully and deployed the highmedorg_helloDic process.
- Start the DSF FHIR server for the
Test_HRPorganization in a fifth at location.../dsf-process-tutorial/test-setup:
docker-compose up hrp-fhirVerify the DSF FHIR server started successfully. You can access the webservice of the DSF FHIR server at https://hrp/fhir.
The DSF FHIR server uses a server certificate that was generated during the first maven build. To authenticate yourself to the server you can use the client certificate located at .../dsf-process-tutorial/test-data-generator/cert/Webbrowser_Test_User/Webbrowser_Test_User_certificate.p12 (Password: password).
- Start the DSF BPE server for the
Test_HRPorganization in a sixth console at location.../dsf-process-tutorial/test-setup:
docker-compose up hrp-bpeVerify the DSF BPE server started successfully and deployed the highmedorg_helloHrp process. The DSF BPE server should print a message that the process was deployed. The DSF FHIR server should now have a new ActivityDefinition resource. Go to https://hrp/fhir/ActivityDefinition to check if the expected resource was created by the BPE while deploying the process. The returned FHIR Bundle should contain a three ActivityDefinition resources. Also, go to https://hrp/fhir/StructureDefinition?url=http://highmed.org/fhir/StructureDefinition/task-hello-hrp to check if the expected Task profile was created.
- Start the
highmedorg_helloDicprocess by posting a specific FHIR Task resource to the DSF FHIR server of theTest_DICorganization: Execute therefore themainmethod of theorg.highmed.dsf.process.tutorial.TutorialExampleStarterclass to create the Task resource needed to start thehighmedorg_helloDicprocess.
Verify that the FHIR Task resource was created at the DSF FHIR server and the highmedorg_helloDic process was executed by the DSF BPE server of the Test_DIC organization. The DSF BPE server of the Test_DIC organization should print a message showing that a Task resource to start the highmedorg_helloCos process was sent to the Test_COS organization.
Verify that a FHIR Task resource was created at the DSF FHIR server of the Test_COS organization and the highmedorg_helloCos process was executed by the DSF BPE server of the Test_COS organization. The DSF BPE server of the Test_COS organization should print a message showing that a Task resource to start the highmedorg_helloHrp process was send to the Test_HRP organization.
Based on the value of the Task.input parameter you send, the highmedorg_helloHrp process will either send a goodbyDic message to the Test_DIC organization or finish without sending a message.
To trigger the goodbyDic message, use send-response as the http://highmed.org/fhir/CodeSystem/tutorial#tutorial-input input parameter.
Verify that the highmedorg_helloDic process either finishes with the arrival of the goodbyDic message or after waiting for two minutes.
Prerequisites | Exercise 1 | Exercise 1.1 | Exercise 2 | Exercise 3 | Exercise 4 | Exercise 5